How to Make Your Anti-Oops! Smarter

Anti-Oops! technology uses artificial intelligence to make sure that your messages don’t contain any errors and that you haven’t forgotten to attach a document before sending an email. This is all done automatically, but you can adjust the settings to better control its activation.
Specify the Text That Will Not Be Checked
You can ask Anti-Oops! to disregard certain portions of text in your emails, such as your signature or the text automatically generated by your email provider.
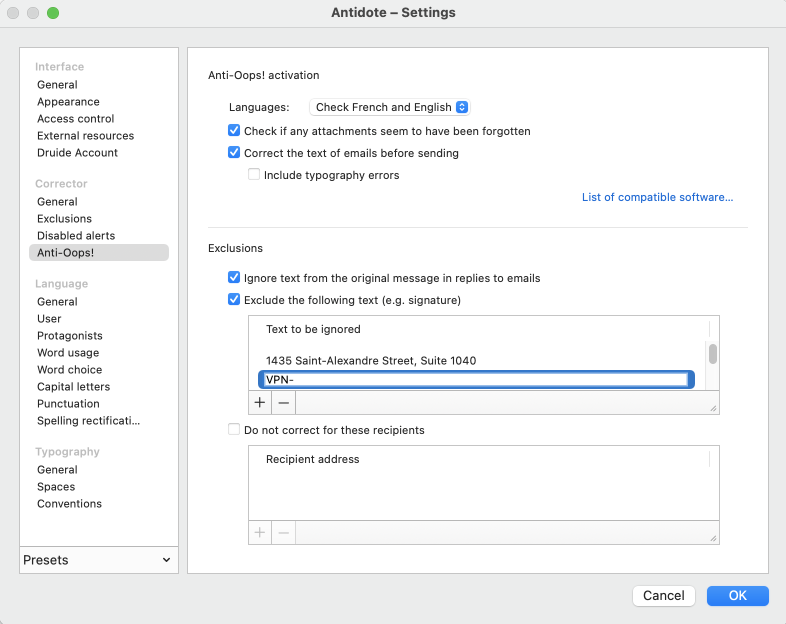
To indicate these passages, go to Antidote’s Settings, and open the Anti-Oops! panel (1) located in the Corrector section. Click on the + button (2) and enter the text to be excluded in the field that appears (3).
-
 123
123
You can add as many passages as you want: professional title, address, codes or abbreviations that you use internally, etc. The more thorough your indications, the fewer detections you will have to ignore in the corrector.
Even better, you give Anti-Oops! the means to verify only the relevant content of your message. And if the corrector does not find any detection, it simply does not open. Anti-Oops! briefly displays a message indicating that no intervention is required.

Exclude Your Recipient’s Content
In the same settings panel, make sure the Ignore text from the original message in replies to emails box is checked. This way you avoid needlessly correcting the text of the email to which you are replying. This setting is enabled at installation, so you shouldn’t have to change it.
Streamline Greetings
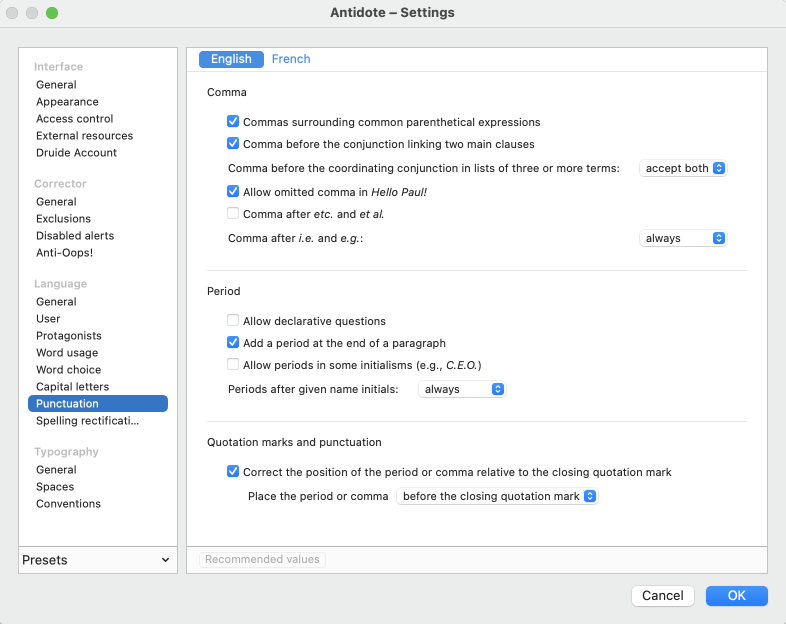
The first line of an email usually contains a greeting, such as “Hello, Paul!”. The standard rule requires a comma between the interjection and the name. However, in common usage, the comma is generally omitted. If you prefer the “Hello Paul!”, there is a setting of Antidote specifically for this. Open the Punctuation panel, located in the Language settings, and check the box to Allow omitted comma in Hello Paul!. And that’s one less detection to handle in the corrector, whether in your emails or elsewhere!
Bypass Anti-Oops! Activation
By default, Anti-Oops! automatically checks all emails you send. If you do not want to benefit from this safety net at all times, you have the option of restricting its activation. Up to you. 🙈
Exclude Recipients or Domains
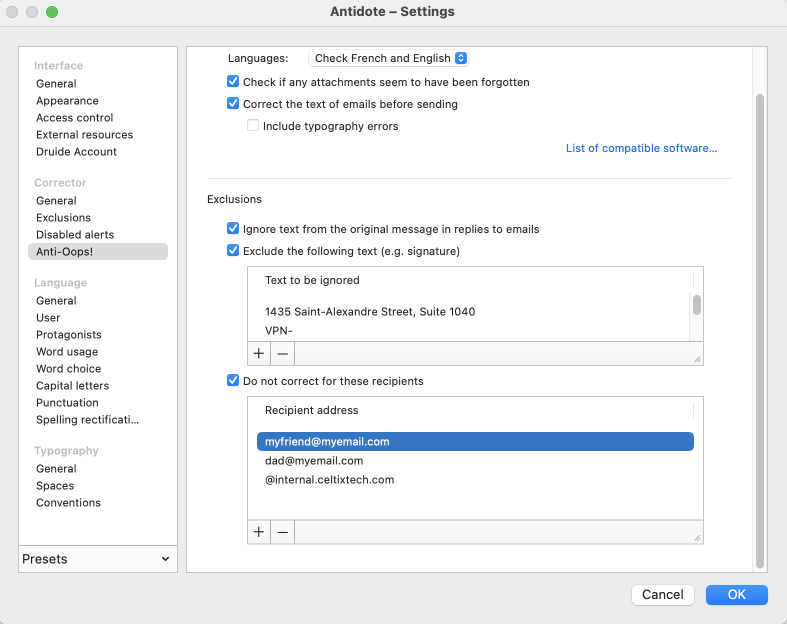
Maybe you don’t want to take advantage of Anti-Oops! to write to your significant other, a parent or a loved one who you regularly write to more informally. Just add their email address to the exclusions.
You can also target recipients to exclude based on their email address domain, such as “@celtixtech.com”. This can be useful if you exchange many emails of a technical nature with an internal team at work, for example.
Enter these workarounds in the Anti-Oops! settings panel, just below the text to exclude. Check the Do not correct for these recipients box and click the + to add an address or address segment that applies to multiple recipients.
Send an Email Without Running Anti-Oops!
There is a keyboard shortcut to block Anti-Oops! when sending an email: press the Shift key when clicking the send button.
In closing, here’s a trick that many are still unaware of: The paper airplane icon in the Anti-Oops! corrector allows you to send the email directly after your review. No need to close the window. That’s one click less with each email!


