How to Update Access to Antidote Web for the New School Year

The back-to-school period is an exciting time for students and teachers alike. It is also a busy time for school administrators, who are in charge of organizing the new groups formed each year or each trimester. Luckily, you can reassign access to Antidote Web on a term-by-term basis to include new students at your school.
Antidote Web’s flexibility is one of its main advantages for organizations: access is given to a set number of users, not to specific users or workstations. There are several ways to reassign access to Antidote Web among your users. Before going any further, make sure these conditions apply to you:
- Your school has a subscription to Antidote Web, not a per-device license for Antidote. (See the differences between the two.)
- You have a Druide account with the role of administrator or technician at your organization.
Note — All operations presented in this article can be done in the Users tab of your organization’s Client Portal.
Modifying Access for a Few Users with a Manual Update
Giving access
To give certain accounts access to Antidote Web, check them off in the list of users, click the More button, then select Manage access to Antidote Web. In the pop-up window, select your Antidote subscription and click Assign.
Removing access
To remove access to Antidote Web, the steps are exactly the same, except in the pop-up window, select None.
Bulk Editing Access with Update by Import
Update by import allows you to edit your organization’s user data using Excel or CSV files. In a single operation, you can add, edit, remove and delete accounts. You can also edit users’ roles and their access to Antidote Web. The general procedure has three steps.
Step 1 – Export the list of users
Click the More button and select Export list to download the file.

Step 2 – Edit access to Antidote Web
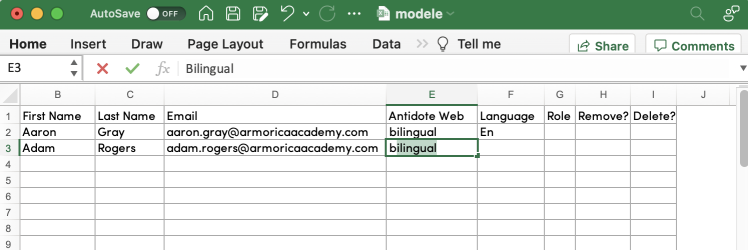
Open the file and find the Antidote Web access column.

Make the changes using the following values:
| Modification | Value to enter |
|---|---|
| Grant access to Antidote Web — English | english |
| Grant access to Antidote Web — French | french |
| Grant access to Antidote Web — Bilingual | bilingual |
| Remove current access | none |
Warning — Make sure not to change the column headings so that the system can recognize the data. If the cell is empty or if the value is invalid, there will be no change to the access already saved.
Step 3 – Import the edited file
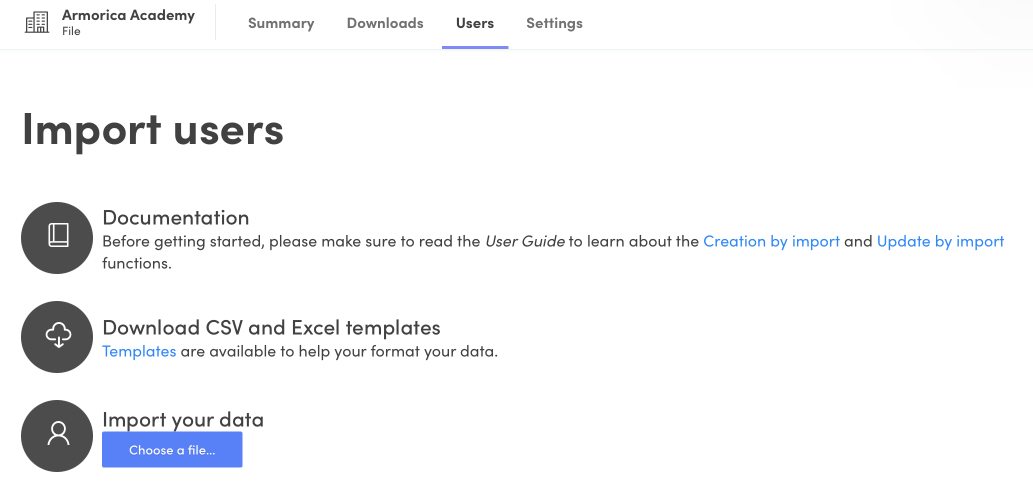
Return to the Users tab in your organization’s Client portal. Click the button Add users, then select Import a list.
On the next screen, click on the Choose a file button and select your edited file. A preview of the data will appear in a pop-up window. Finally, click Process the data to start the import.
An email report summarizing the results of this operation will automatically be sent once the data has been processed. If the list is very short, the report will appear directly on the interface in a few seconds.
Reassigning Access from Scratch
If your organization wants to change access to Antidote Web for a significant number of users, the easiest solution is to remove access for all users associated with a subscription, then reassign it by importing.
Step 1 – Remove access for all users associated with a subscription
Use the Antidote Web access filter and select the subscription for which you wish to make changes. Check off the box to select all the displayed users.
Click on More and select Manage access to Antidote Web from the drop-down menu.
In the window that appears, select None, then click on Assign.
Step 2 – Import the list of users you wish to give access to
- Click Add users and select Import a list from the drop-down menu.
-
Click on the Templates link to download the Excel or CSV file templates.
-
- Fill in the template file by entering the users to you wish to give access to.
-
Assign users a subscription by entering the corresponding value in the Antidote Web column.

Just like for update by import, make sure you don’t change the column headings.
- Back in the Client Portal, click Choose a file and select your list.
-
Click Process the data to start the importation operation.
Important — If the number of users imported exceeds your subscription’s limit, the excess account(s) will be added to your user list but will not have access to Antidote Web.
Sending Invitations
Here’s how to tell your users they now have access to Antidote Web:
- Select the accounts of the users that you wish to invite. Use the Invitation status filter to make it easier by selecting Ready for invitation.
- Click the More button and select Send invitation email.
- If you want to send another invitation to users that have already received one, check the corresponding box. Otherwise, they will not receive an email, like those who already accepted their invitation but who may have been selected accidentally.
- Finally, click the Send button.
There you go! Your organization’s users are now able to use Antidote Web to improve their writing.
To learn more about account management, consult the Organization Client Portal User Guide. If your educational institution does not yet have Antidote Web, contact our team to learn about the options available to you.
Happy back to school season!


